| PHOTO ENLARGEMENT SOFTWARE |
 |
|
Photography has become very popular because of the accessibility to equipment and the amount of resources we can find online about the topic. Even if you don't have an expensive high-end camera, you most likely have a camera on a portable device (eg. cell phone or tablet).
We've discussed and reviewed the various digital editing software available for editing photos. This is great if you want to edit and share your photos online, or you know the image quality will come out beautiful on a print. But what if you have a photo you know will not look good when it is enlarged? There is software available that can enlarge photos and improve the appearance by blurring and softening out noise, pixelation and graininess. But keep in mind, this softening or blurring effect may alter how the original image looks. If you plan on making very large prints, these programs will not enhance the resolution without tweaking the overall appearance. If you haven't read our guide to image resolution, we go in-depth about this topic and why there is no easy fix to increase an image's quality.
In this article, we will look at five programs that can be used to enlarge photos. These programs have automated features that will enlarge your photos quickly and without much effort.
|
SUMMARY
| Image Resolution |
Softwares for Enlarging Photos |
| We will quickly go over image resolution before getting into the different software. Please read our full article on image resolution for more information. |
- On1 Perfect Resize
- SmillaEnlarger
- Gimp
- IrfanView
- Adobe Photoshop
|
|
| IMAGE RESOLUTION
|
 |
|
We will quickly touch on image resolution before we get into the article. However, we highly recommend you checking out our guide to image resolution.
"High resolution" is a relatively subjective term which depends on various factors including, notably, how picky or experienced the photographer is. It is more objective to consider the term "resolution" on its own. The terms "high resolution" and "DPI/PPI" are most commonly used when trying to describe an image's quality.
One common mistake that people make, when they are resizing their image, is changing the resolution/DPI of their image. By increasing the number, they are actually "stretching out" the image.
When the number increases, the pixel dimensions will also increase. Increasing the over dimensions of the image, means we would need to have more pixels to "fill" the new size. For example, if the image is 72 DPI and we increase it to 300 DPI, we aren't adding new pixels to the image, we have to inflate the pixels so that it can fill the larger size. This is how pixelation occurs, since the pixels are being stretched they become more visible.
Other terms that are used to describe a low quality image are noise, graininess and blurriness. Sometimes the image is already noisy or blurry, but when it is enlarge these effects are amplified; it doesn't necessarily happen after it has been enlarged, like pixelation does. Noise and graininess are present in all photos but most of the times it is near invisible. The visibility of noise and graininess is tied to how much light is going into the camera. This is usually based on the ISO setting on a camera. A blurry photo is usually just the result of a shaky hand or movement in the image. This can be avoided by using a tripod or monopod.
|

Enlarging this 600x400 pixel photo will result in a low quality priint.
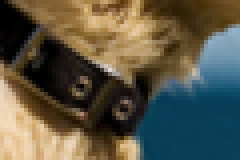
By enlarging this photo to 9600x6400 pixels (four times it's original size), it becomes pixelated.
|
|
On1 is a company that focuses on making photography based apps to simplify the editing process. Their Perfect Resize software claims to be able to enlarge photos up to 1000%, while maintaining the best image quality for print. The product is described as using "Genuine Fractals" to optimize photos when they are enlarged.
A useful feature that comes with the software is the ability to install it as a plug-in in Adobe Photoshop and Lightroom. However, we will be testing out the stand-alone software for this article.
The program is very straight forward, you open your photo and the resizing tool bar will appear on the side. We enlarged our image to 4 times the original size and we noticed that image is still relatively clear. There is a noticeable softening effect but we don't think it takes away from the overall image. You have the option of changing the texture, smoothness and sharpness of your image. Once you like what you see in the preview, hit apply and your photo becomes enlarged. In our example, we did not tweak it with any of the other features.
When you save the file you have the option of saving it as a Photoshop file (.psd). If you use any of the program's other features it will automatically make layers that can be edited in Photoshop. This will be very useful if you want to edit it further in Photoshop.
Other useful feature include printer options, canvas gallery wrap option and a tiling option. The print settings include various standard sizes for prints based on the printer brand. This can be useful if you want to print directly from the software. It also crops and sets up the document so you can get a great print from your newly enlarged photo. It also sets up your photo for a canvas gallery wrap. The program will add the edges to your image and makes the set up a breeze. The tiling option allows you to quickly divide your image up if you wanted to create a mosaic or collage out of your photo.
This program is available for purchase on On1's website or through the Apple app store. It is compatible on both MAC and Windows.
|
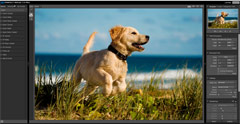
On1 Perfect Resize (stand-alone version)
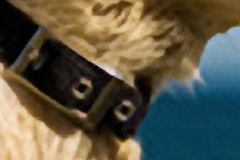
Enlarged four times the original size.
|
|
SmillaEnlarger is a program that also boast the ability to enlarge photos without sacrificing image quality. Like the previous software, the developer has created a special algorithm to have the ability to enhance enlarged photos.
The interface is very simple, with a few buttons and sliders to adjust your photo. You open your image and there are four enlarging options to choose from: default, sharp, painted and sharp & noise. These effects are applied to your image to help preserve the image quality. You can adjust the settings for each parameter to fit your photo.
In this software, we also enlarged the image to 4 times the original size and we did not adjust any of the default settings. The changes happened very quickly and we could preview the details up close. You can also use the cropping tool to crop your image how you like, there are also preset options for cropping if you need extra help. Depending on which parameter you choose for your image, the final result will differ.
SmillaEnlarger is an open source program and it is free to use. It is a very compact and power tool to enlarge your photos with. It is compatible on both MAC and Windows.
|
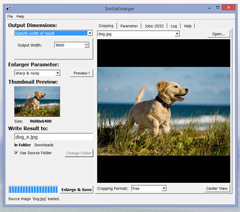
SmillaEnlarger Interface

Enlarged using "default" settings.

Enlarged using "sharp" settings.

Enlarged using "painted" settings.
Enlarged using "sharp and noisy" settings.
|
|
You may recall Gimp being featured in our digital editing software article. It has a image enlarging option that also has the ability to enlarge photos without losing image quality.
Since it is an image editing software, you will notice that it has more features than the previous programs we featured. Thus having more options to tweak your photo. For our purposes, we will only use the automated features in their "scale image" function.
To enlarge your photo, you need to go to image > scale image. The tool box will let you enter in the size you want to enlarge it to, and what resolution it should be. There is a third parameter named "quality" and there is a list of four options you can choose from: none, linear, cubic and sinc (lanczos3).
So far all the programs we have looked at has an algorithm to enlarge the photo, and this program is no different. The previous two programs touts that their algorithm is unique to their product. We tried out all four of the resampling options and the results were very close, with the exception of "none". None made the image pixelated. The best one would depend on the photo and your preference. We didn't use any of the other features in the program, but if the photo isn't perfect, you have many choices available in this free program to edit your photos. You can download it to your MAC or Windows computer.
|
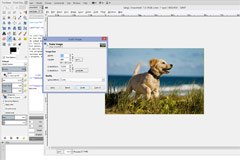
Gimp Interface
No interpolation.

Linear interpolation.

Cubic interpolation.

Sinc (Lanczos3) interpolation.
|
|
IrfanView is a little different from the other applications that we've looked at, so far. It is a image viewer like Apple's Preview or Window's Photo Viewer. The developers describe the program as a fast, compact and innovative graphic viewer. It has more capabilities than average image viewers, but it is not a photo editor.
To enlarge photos, you open your image and go to image > resize/resample (ctrl+r). A window will appear with your options. You enter in the size you want it to be resized to and choose the resolution. Let the last program, it also has a list of resampling filters you can choose from. Each one varied slightly from one another, so you will have options based on your photo.
This program is free for personal use, and if you want to use it for commercial purposes, you must contact the developer for more information. This program is only available for Windows platforms.
|
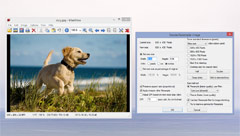
Irfan View Interface

Lanczos Filter

Hermite Filter

Triangle Filter

Mitchell Filter
|
|
We've have featured Photoshop in our digital editing software article, and it is one of the most well-known softwares for editing photos. So it would not be a doubt that it also can enlarge photos.
You would open your file and go to image > image size. Now, we mentioned in our image resolution article changing the DPI number is not the most effective way to improve your photo's resolution. However, it also has it's own algorithm to enhance photos after it has been enlarged. There are five options in the resampling drop down bar you can choose from. Bicubic smoother is specifically recommended for enlarging photos, and in our opinion it doesn't look any different from the other options. Again, this is based solely on preference.
The image also has a softened appearance. The great thing about having Photoshop as one of your tools, is that you can use any of the other functions to enhance your photo.
|
Nearest Neighbour resampling.

Bilinear resampling.

Bicubic resampling

Bicubic Smoother resampling
|
|
Regardless of the program you decide to use to enlarge your photo, keep it in mind that when you enlarge a photo be aware that it will not be completely crisp and sharp. In order to make these photos not look grainy, noisy or pixelated, they photos had to go through filters to make it turn out this way. If still aren't confident in using these programs, you can add retouching to your order and our graphic designer will tweak the photo to make it look great!
If you have questions about any of our services or products, don't hesitate to contact us. Our knowledgeable staff is always happy to assist with answers, advice, or suggestions.
|
|
© 2002-2026 - KeenART Media Ltd.
|
|
| |
|
